Connecting to a Soundweb London network
This guide will walk you through the process of configuring your PC running HiQnet London Architect to communicate with a network of Soundweb London devices. Before you begin, please ensure that all Soundweb London devices are connected to the same network as the PC running HiQnet London Architect.
Install London Architect
Install the latest version of HiQnet London Architect on the computer you will use for system control. You can download it from http://www.bssaudio.com/.
Do not start HiQnet London Architect on the computer until instructed to do so below at Start and Configure HiQnet London Architect
Turn Off Windows Firewall
PC firewall software, such as Windows Firewall or third-party firewall products, can interfere with HiQnet London Architect's ability to connect to a Soundweb London network. To avoid connection problems, firewall software should be disabled.
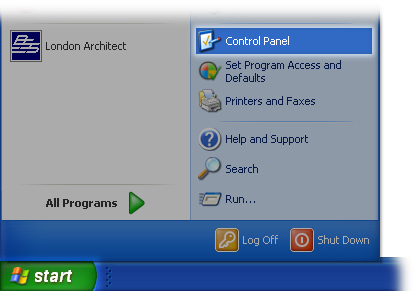
Open the Windows Control Panel by selecting "Control Panel" from the Start menu.
Double-click "Windows Firewall" to open the Windows Firewall settings.

Note: This step will be slightly different if you use the Category view of the Windows Control Panel.Disable the Windows Firewall by clicking "Off (not recommended)" (You can reactivate the firewall when you are done using HiQnet London Architect).
- Turn off any third-party firewall software (Symantec, McAfee, Zone Alarm, etc.).
Adjust Windows Network Properties
All Soundweb London devices must be in the same IP address range as the PC running HiQnet London Architect. Achieving this will depend on whether your network includes a DHCP server, and whether you use static or dynamic addressing. Only basic network configurations are covered here. For more advanced configurations, consult a TCP/IP networking guide or network specialist.
Open the Windows Control Panel by selecting "Control Panel" from the Start menu.

Double-click the Network Connections icon.

Note: This step will be slightly different if you use the Category view of the Windows Control Panel.Right click on the network interface connected to the Soundweb London network and select "Properties".
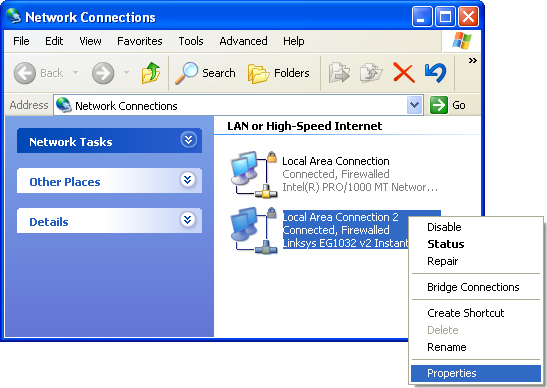
Find and click "Internet Protocol (TCP/IP)" in the list of network services, then click Properties.

Write down any existing information to be re-entered later.
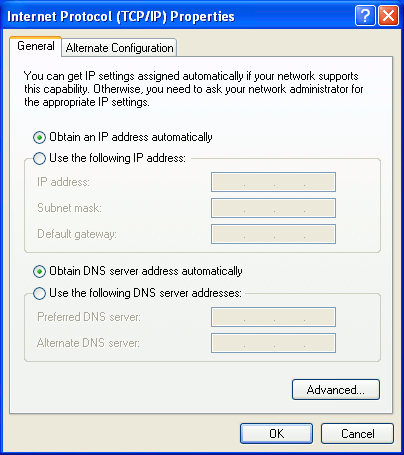
- With a DHCP server
Select "Obtain an IP address automatically".
- Select "Obtain DNS server address automatically".
Without a DHCP server
- If your Soundweb London devices have not been assigned IP addresses:
Select "Obtain an IP address automatically".
Select "Obtain DNS server address automatically".
Click on the "Alternate Configuration" tab.
Write down any existing information to be re-entered later.
- Select "Automatic private IP address".
If your Soundweb London devices have been assigned IP addresses outside of the 169.254.x.x range:
Select "Use the following IP address"
Enter a unique IP address in the same range as the Soundweb London network.
- Enter the subnet mask used by the Soundweb
London network.
Note: HiQnet London Architect may not be able to access the Soundweb London network if multiple IP addresses are assigned to the network interface (by clicking the "Advanced..." button). Only one IP address should be assigned to each interface.
- Click OK and close the network properties windows.
Start and Configure HiQnet London Architect
Start HiQnet London Architect.
If any firewall messages are displayed asking whether to allow network access for HiQnet London Architect or Main.exe, choose "Allow" or "Accept". The safest option is to disable firewall software while using HiQnet London Architect.
- Click "Tools" on the HiQnet London Architect
menu and select "Application Preferences".

Open the HiQnet tab and check the network interfaces connected to the Soundweb London network.
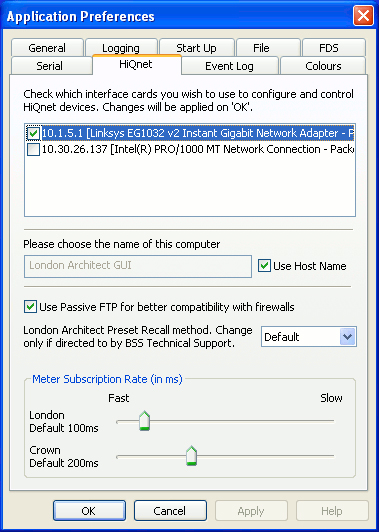
Click "OK".
Verify Network Connection
Click "View" on the HiQnet London Architect menu and select "Network".
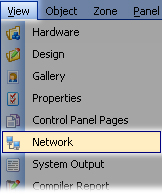
The HiQnet London Architect Network view will open at the bottom of the screen.
- Click the green and red Refresh button.

Connected Soundweb London devices will start appearing in the network tree, grouped by model. It can take up to 45 seconds for all devices to be discovered.
|
|
|
|
Update Device Firmware
All Soundweb London devices on a network must be running the latest firmware included with the version of HiQnet London Architect in use before they may be controlled by HiQnet London Architect. To update the firmware:
In the Network Window, click on the icon shown below to open the firmware wizard.

This will display a list of all the Soundweb London devices discovered on the network.
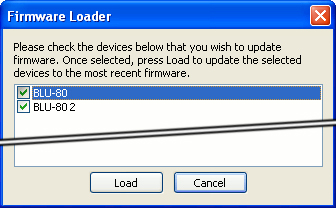
Make sure all the devices listed are checked and press the Load button. The firmware transfer will take several minutes, during which time the devices may reboot several times.
Configure Device Network Settings
Depending on the layout and configuration of your network, it may be necessary or desirable to change the default TCP/IP settings of your Soundweb London devices. Soundweb London devices default to AutoIP/DHCP mode in which IP settings are obtained from a DHCP server if one is available. If no DHCP server is available, the device will choose an IP address in the 169.254.xxx.xxx range. Soundweb London devices may also be configured to use a static IP address. If the IP address range used by the Soundweb London devices is changed, don't forget to update your PC's TCP/IP settings to match once you're done configuring the devices.
You may also want to assign a new HiQnet address to each device to ease management of the network, simplify the configuration of third-party control systems, and avoid potential HiQnet address conflicts. Refer to the Network Troubleshooting guide for more information.
To change a device's name, TCP/IP settings, or HiQnet address:
In the Network view, find the device you want to change in the device tree under the Ethernet category. Useful information pertaining to the selected device (such as the name, TCP/IP settings, and I/O card configuration) is displayed on the right side of the Network view.
- To identify which item in the device tree corresponds
to a physical device, click the blue Locate button
in the Network view. The Locate button on that Soundweb
London device will flash. You can also press the Locate
button on the physical device, causing a flashing
icon to appear next to the corresponding item in the
device tree.

Open the Device Properties window by clicking on the gears icon in the Network view.

Here you can change the name, HiQnet Address and IP address of the selected device. Device names will be discussed in more detail below.
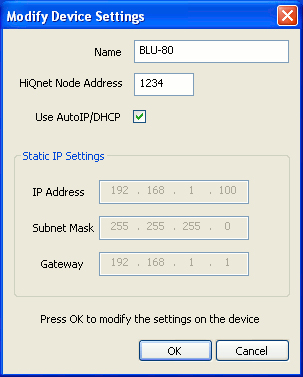
The device will reboot after you press "OK" on the Modify Device Settings window. After reboot, the device will have the new settings. In some cases the device may need to be restarted manually for the new settings to take effect.
Open or Create a HiQnet London Architect Design File
If a HiQnet London Architect design has been prepared for the Soundweb London network, you will need to open it now.
If the file is stored on the PC running HiQnet London Architect:
Click File, select Open, and find and load the file.
If the file is stored on the Soundweb London device network:
Click File, select Open From Device Network, and proceed as directed.
Match Devices
If you are working from an existing HiQnet London Architect design, the name, model, and I/O configuration of each physical device on the network must match the name, model, and I/O configuration of each corresponding device in the design. The process of assigning physical devices to design devices is called "matching devices".
To match a physical device to a design device:
Change the name of the physical device to match the name of the corresponding design device. See the Configure Device Network Settings section for instructions on changing a device's name.
When a matching physical device is found for a design device, a message may be displayed indicating that the HiQnet address of the physical device does not match the HiQnet address of the device in the design. It is recommended that you answer "Yes", changing the HiQnet address of the design device to match that of the physical device. If a third-party control system (such as those produced by Crestron or AMX) will be used with the design, then it is recommended that you answer "No" to change the HiQnet address of the physical device to match the design, as third-party controllers depend on consistent HiQnet addresses to communicate with Soundweb London devices. See the previous section on changing device network settings if you wish to set a device's HiQnet address manually.
As each physical device is matched to a design device, its name under the "Ethernet" branch in the device tree will change from red to black, and a green star will appear above the design device in the System Layout window. Remaining unmatched design devices will be shown under "Unassigned Design Devices" in the device tree.
If a design device still doesn't match its intended physical device after changing the physical device's name to match, verify that the devices are the same model and that their I/O card configurations match.
- Once the process of matching devices is complete,
each design device in the System Layout will have
a green star, indicating that it matches a device
on the network.
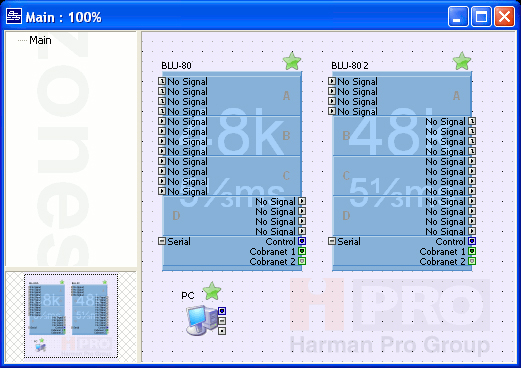
Note: some design objects in the System Layout do not correspond to a networked device. These will not be displayed with a green star.
Upload the Design to the Device Network
Once the design devices are all matched to physical devices, it is necessary to upload the device design configurations to the physical devices. To upload the device configurations in HiQnet London Architect to the actual Soundweb London devices:
Click on the "Run" button (which looks like a VCR play button) in the toolbar at the top of the window or the "Online" button at the bottom of the window to upload the device configurations to the Soundweb London network and begin controlling the devices. This is called "Going Online".
Note: This is not the same as saving the design to the device network.
If the device configurations in HiQnet London Architect differ from those previously uploaded to the Soundweb London devices, the Load window will appear and show which devices on the network need their configurations uploaded.

Press the green arrow at the top of the list to upload configurations to all devices sequentially, or press the green arrow next to each device to upload the configuration for that device individually. This will overwrite the design currently in the device with the design open in HiQnet London Architect. After loading is complete, press "OK".
- If the HiQnet London Architect device configurations
match those on the Soundweb London devices, the Parameter
Synchronisation window will appear, allowing you to
send control parameters to or receive control parameters
from the device.

Press the green arrow at the top of the list to send current control parameters in HiQnet London Architect to all devices, or press the green arrow next to each device to send control parameters to that device individually.
Press the red arrow at the top of the list to receive current control parameters from all devices, or press the red arrow next to each device to receive control parameters from that device individually.
As you change control parameters while online, the system will respond in real time. The devices will retain their control settings if power is lost, and come back in the same state when power is restored.
- You will have to go offline to save any changes you have made to the design file. To go offline and return to design mode, click the "Stop Button" in the tool bar at the top of the window or the "Online" button at the bottom of the window. You can go back online by clicking the "Run" or "Online" buttons again.
